Apple Mail

Apple Mail, auch bekannt als mail.app oder einfach Mail, ist ein proprietäres E-Mailprogramm für Max OSX. Es ist einfach zu bedienen, aber wir empfehlen es nicht, weil es quelloffen (Freie Software).
Wenn du Apple Mail benutzen willst, folgende diese Schritt. Vor der Benutzung ist zu entscheiden, ob du IMAP oder POP benutzen möchtest. Wenn du unsicher, ist wahrscheinlich IMAP besser.
Erhöhe die Sicherheit
- Aktiviere niemals sichere Passwörter oder sichere Authentifizierung. Diese Begriffe suggerieren fälschlicherweise mehr Sicherheit. Diese Methoden erfordern aber, dass auf dem Emailserver eine Kopie des Passwortes im Klartext gespeichert wird. Aus unserer Sicht ist das ein Sicherheitsrisiko, also bieten wir diese Funktionen nicht an. Weil die Verbindung zu Riseup ohnehin verschlüsselt ist, besteht dafür auch kein Bedarf.
- Verschlüssel deine E-Mails! Benutze OpenPGP zur Verbesserung deiner Nachrichtensicherheit.
- Die sichere Verbindung kann TLS oder StartTLS sein. Aus Sicherheitsgründen bieten wir SSL nicht mehr an. Du solltest StartTLS nicht mehr benutzten. Es ist viel besser, das reguläre TLS zu verwenden. Um deine Datensicherheit zu verbessern, kannst du in deinem Account den Verbindungstyp von StartTLS auf TLS ändern.
- Es gibt viele Angriffsmöglichkeiten auf gesicherte Verbindungen. Wenn du hohen Sicherheitsbedarf hast, solltest du in Betracht ziehen, dich zu allen Riseup-Services durch das Riseup VPN zu verbinden. Das beugt gegen viele Angriffsmöglichkeiten auf deine Kommunikationsdaten vor.
- Mit Tor kannst du Riseup’s .onion services für IMAP and SMTP benutzten. Die passenden
mail.*.onionundsmtp.*.onion-Adressen findest du auf der verlinkten Seite. In den Einstellungen vom deinem Mail-Client musst du nun einfachmail.riseup.netdurch die Onion-Adressen ersetzten. Hinweis: Der SMTP Port 465 wird oft von Exit-Nodes geblockt. Port 587 ist dann aber oft dennoch verfügbar. Wenn ein Problem beim Senden von Mails besteht, benutze Port 587, oder konfiguriere dein Programm, Riseups SMTP-onion-Dienst anstelle vonmail.riseup.netzu benutzen. Das ist besser, als deine Daten durch einen Tor-Exit zu schicken, weil es MITM-resistent ist, aber es erzeugt Fehler für das SSL-Zertifikat bei deinem Emailprogramm.
OpenPGP mit Apple Mail
- Lade die letzte Version der GPG Tools
- Installiere das Paket
- Danach kann GPG benutzt werden und wird integriert in Apple Mail.
POP-Konto erstellen
Leider wurde dieser Abschnitt noch nicht geschrieben. Hilf mit!
IMAP-Konto erstellen
Leider wurde dieser Abschnitt noch nicht übersetzt. Hilf mit!
First Time User
If you are already using mail, see existing user below.
The first time you start mail, a dialog will appear requesting your account information:
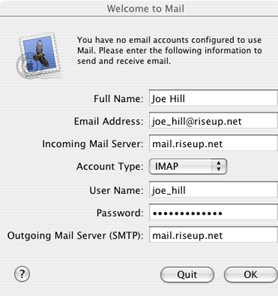
- Enter your name.
- Enter your full email address, i.e. joe_hill@riseup.net.
- Both incoming and SMTP servers should both be “mail.riseup.net”.
- Select “IMAP” account type
- Your username is the part of your email address before the @ sign, in this case, “joe_hill”.
- VERY IMPORTANT! Do not enter your current password! Why? Because it will be transmitted over the internet unencrypted, and someone could get it from you! We need to setup some things before it will be encrypted. Enter an incorrect password here. You will occasionally get a dialog box requesting your password when mail attempts to check your mail. Ignore it until you finish setting up the secure connections. Just hit cancel when these messages appear.
- Select “OK”.
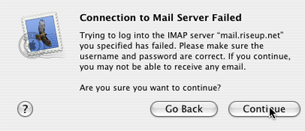
An error message will appear, but just click continue:
Existing User
This section is for adding an account profile if you have already been running Apple Mail. Users who just configured an account in the First Time User section should skip this.
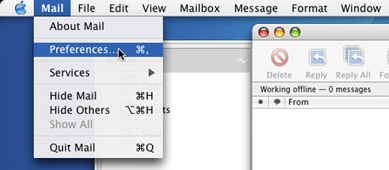
- Select menu item Mail > Preferences…
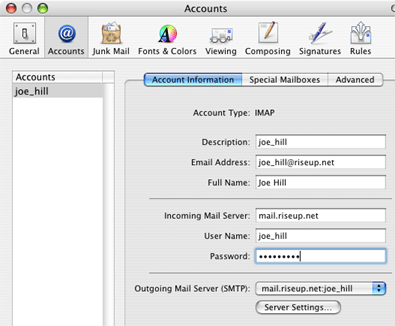
- Select the Accounts tab.
- Click on the + button in the lower-left corner of the screen.
- For account type, select IMAP.
- Enter a description (it can be anything, we suggest your email address).
- Enter your full email address, i.e. joe_hill@riseup.net.
- Your incoming mail server is mail.riseup.net.
- Your user name is the portion of your riseup address before the “@”
Managing Account Settings
In this section, we assume you have the preferences window open. To do so:
- Select menu item Mail > Preferences…
Setup Encryption For Receiving Mail
- Click on Accounts and select your riseup email account
- Now select the Advanced tab.
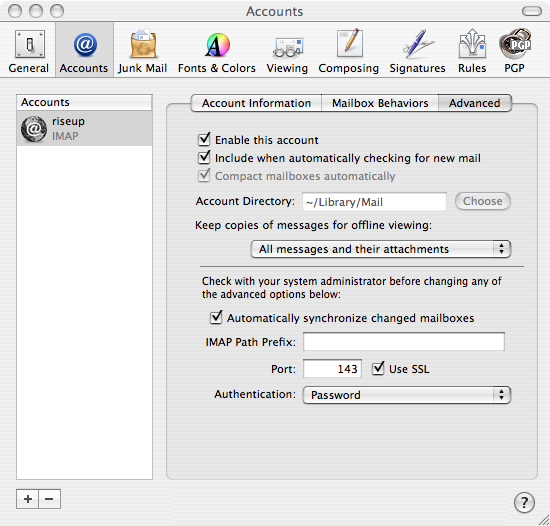
- Click “Automatically synchronize changed mailboxes”
- Click “Use SSL”
Note: If you have trouble receiving mail, try using port 993 instead of 143.
Setup Encryption For Sending Mail
- Click On “Account Information”
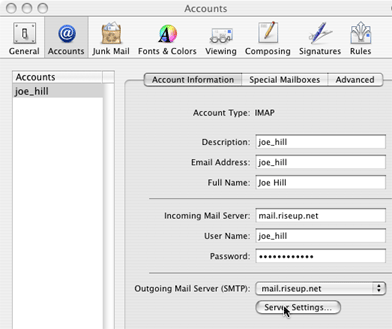
- Make sure that your SMTP server is set to mail.riseup.net
Note for existing mail users: You will need to select “Add Server” from the SMTP pull-down menu. - If it is, select “Server Settings”
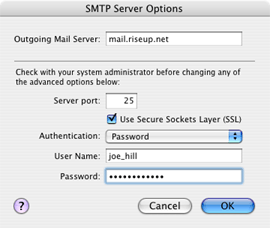
- For Server Port, put 587.
- Select Use Secure Socket Layer (SSL).
- Set Authentication to Password
- Now, enter your correct user name and your correct password.
- Select OK.
Note: If you have trouble sending mail, try using port 465 instead of 587.
For more information on configuring the outgoing server, see E-Mails versenden.
Complete the Setup!
Now, simply enter you correct password in the password box. Your password will be encrypted when sent to the riseup server to send and receive email.
Setting up Folders
The default setup will save your sent mail, drafts, and trash on your local machine instead of on the server. If you want to save it on the server, follow these steps:
- Expand the directory under your mail.riseup.net account on the left side of the screen to expose all of the folders
- Select the relevant folder (e.g. “Trash”, “Sent”, “Drafts”)
- Select the “Mailbox” menu and select “Use this mailbox for” and then select the obvious choice.
- Repeat for the other mailboxes.