Apple Mail

Apple Mail, also known as mail.app or simply Mail, is a proprietary full featured mail client which comes with OS X. It is pretty and easy to use, but we don’t recommend it because it is not Free and Open Source Software (software libre).
If you do want to use Apple Mail, then you can follow our instructions here. The first thing you need to determine before you configure Apple Mail, you need to decide if you will be using IMAP or POP. If you are unsure, you probably want IMAP.
Enhance your email security
- Chiffrez vos courriels ! Pour améliorer la sécurité des messages utilisez Courriels cryptés.
- Il y a de nombreuses vulnérabilités avec comment les connections sécurisées marchent. Si vous avez besoin d’une sécurité élevée, vous devriez toujours vous connecter aux services Riseup en utilisant le VPN Riseup. Cela devrait éviter une longue liste de potentielles attaques contre vos communications.
- Pour améliorer la sécurité de votre connexion vous pouvez utiliser Onion Service configuration pour vous connecter aux services .onion de Riseup avec IMAP et SMTP. Regardez les adresses
mail.*.onionetsmtp.*.onioncorrespondantes dans la page en lien et remplacezmail.riseup.netpour chaque serveur. Note: * Le port SMTP 465 est souvent bloqué par les nœuds de sortie, mais le port 587 est moins fréquemment bloqué. Si vous avez un problème pour envoyer un courriel, essayez le port 587 ou configurez votre client pour utiliser les services cachés courriel de Riseup à la place du domaine habituelmail.riseup.net. C’est mieux que d’envoyer votre trafic à travers une sortie Tor car c’est résistant aux attaques MITM mais cela peut causer des problèmes de certificat côté client.
use OpenPGP with Apple Mail
- Download the latest GPG Tools version
- Install the package
- You’ll be able to use GPG and it’ll be embed with Apple Mail.
Adding a POP Account
We are sorry, but this page has not been written. You can help to write this page
Adding a New IMAP Account
First Time User
If you are already using mail, see existing user below.
The first time you start mail, a dialog will appear requesting your account information:
- Enter your name.
- Enter your full email address, i.e. joe_hill@riseup.net.
- Both incoming and SMTP servers should both be “mail.riseup.net”.
- Select “IMAP” account type
- Your username is the part of your email address before the @ sign, in this case, “joe_hill”.
- VERY IMPORTANT! Do not enter your current password! Why? Because it will be transmitted over the internet unencrypted, and someone could get it from you! We need to setup some things before it will be encrypted. Enter an incorrect password here. You will occasionally get a dialog box requesting your password when mail attempts to check your mail. Ignore it until you finish setting up the secure connections. Just hit cancel when these messages appear.
- Select “OK”.
An error message will appear, but just click continue:
Existing User
This section is for adding an account profile if you have already been running Apple Mail. Users who just configured an account in the First Time User section should skip this.
- Select menu item Mail > Preferences…
- Select the Accounts tab.
- Click on the + button in the lower-left corner of the screen.
- For account type, select IMAP.
- Enter a description (it can be anything, we suggest your email address).
- Enter your full email address, i.e. joe_hill@riseup.net.
- Your incoming mail server is mail.riseup.net.
- Your user name is the portion of your riseup address before the “@”
Managing Account Settings
In this section, we assume you have the preferences window open. To do so:
- Select menu item Mail > Preferences…
Setup Encryption For Receiving Mail
- Click on Accounts and select your riseup email account
- Now select the Advanced tab.
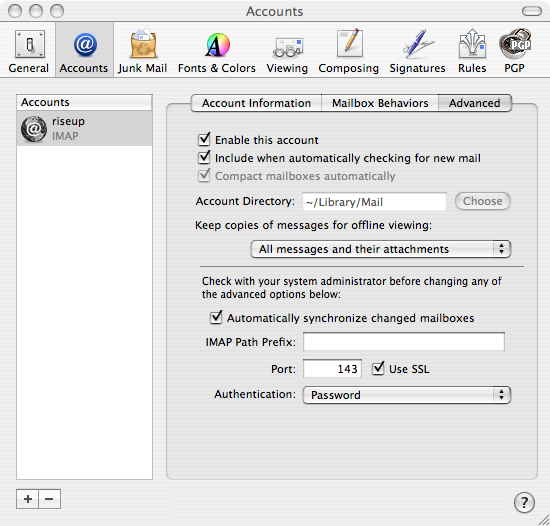
- Click “Automatically synchronize changed mailboxes”
- Click “Use SSL”
Note: If you have trouble receiving mail, try using port 993 instead of 143.
Setup Encryption For Sending Mail
- Click On “Account Information”
- Make sure that your SMTP server is set to mail.riseup.net
Note for existing mail users: You will need to select “Add Server” from the SMTP pull-down menu. - If it is, select “Server Settings”
- For Server Port, put 587.
- Select Use Secure Socket Layer (SSL).
- Set Authentication to Password
- Now, enter your correct user name and your correct password.
- Select OK.
Note: If you have trouble sending mail, try using port 465 instead of 587.
For more information on configuring the outgoing server, see Envoyer des courriels.
Complete the Setup!
Now, simply enter you correct password in the password box. Your password will be encrypted when sent to the riseup server to send and receive email.
Setting up Folders
The default setup will save your sent mail, drafts, and trash on your local machine instead of on the server. If you want to save it on the server, follow these steps:
- Expand the directory under your mail.riseup.net account on the left side of the screen to expose all of the folders
- Select the relevant folder (e.g. “Trash”, “Sent”, “Drafts”)
- Select the “Mailbox” menu and select “Use this mailbox for” and then select the obvious choice.
- Repeat for the other mailboxes.